Yellow Nails

There are several causes of yellow nails, some cosmetic in etiology and others indicative of an underlying medical issue and so it is important to understand when to see a physician.

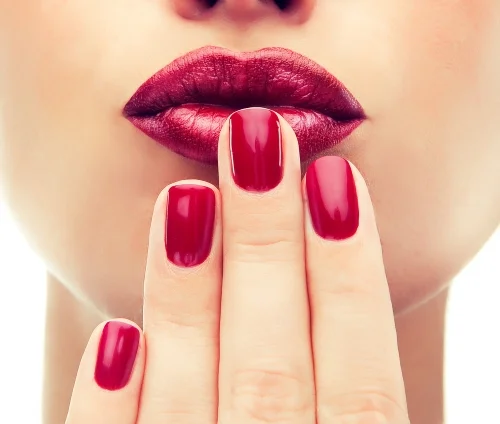
One of the most common causes of yellow nails is from secondary staining from nail lacquer.  Because the porosity of the nail is variable, certain individuals who inherently have more porous nails are more prone to pigment migration and thus secondary yellowing.   Another common cause of polish induced nail yellowing is from the polish remover.  Polish remover dissolves polish resulting in the migration of pigments that then can leach into the nail plate causing yellow discoloration.  Theoretically the longer the soak, the more leaching that will potentially occur.  The last factor related to polish has to do with the dye content of the polish.  Not all polish dyes are alike.   Generally, the darker the color, the more the pigment has an opportunity to migrate and leach into the nail plate to cause yellowing.  While darker colors tend to be the culprit more often, this phenomenon can also occur with lighter colors as well. Yellowing from polish is not a brand related phenomenon.  Yellowing is an issue that can occur with all nail polish brands. 

How do we distinguish polish induced yellowing from other causes of nail yellowing? 

When the cause is purely from polish, the nail will be healthy looking and intact but have a yellow hue throughout.  The surface will be smooth and a normal thickness as opposed to fungal nails where there is thickening or subungual (under the nail) crumbling.   And importantly, there will be a history of prior polish application. 

How to treat?  

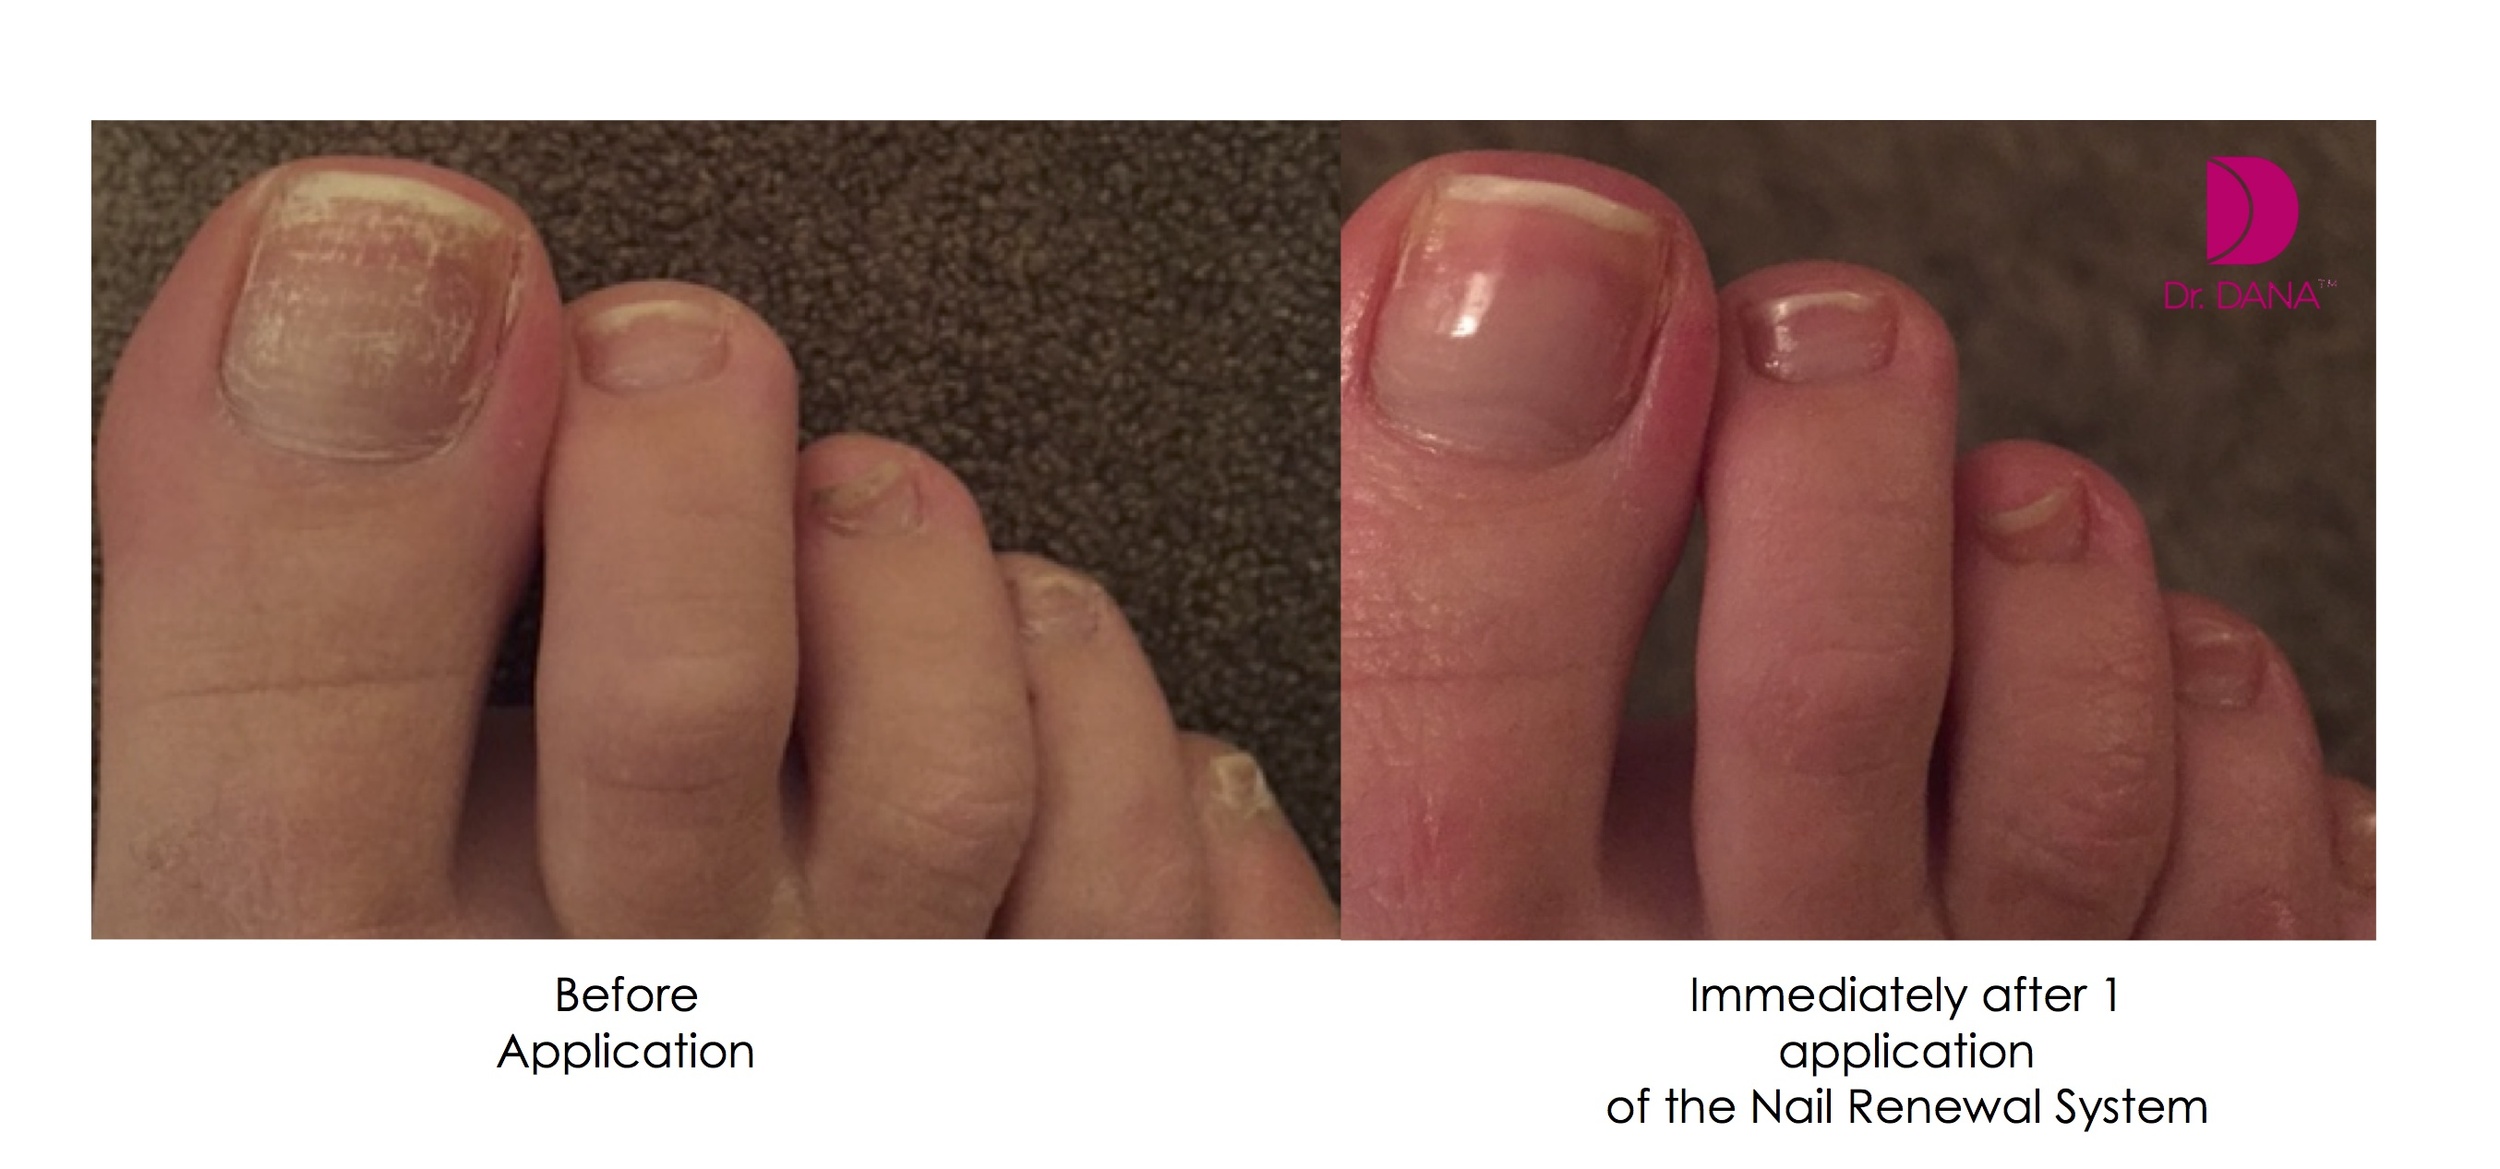
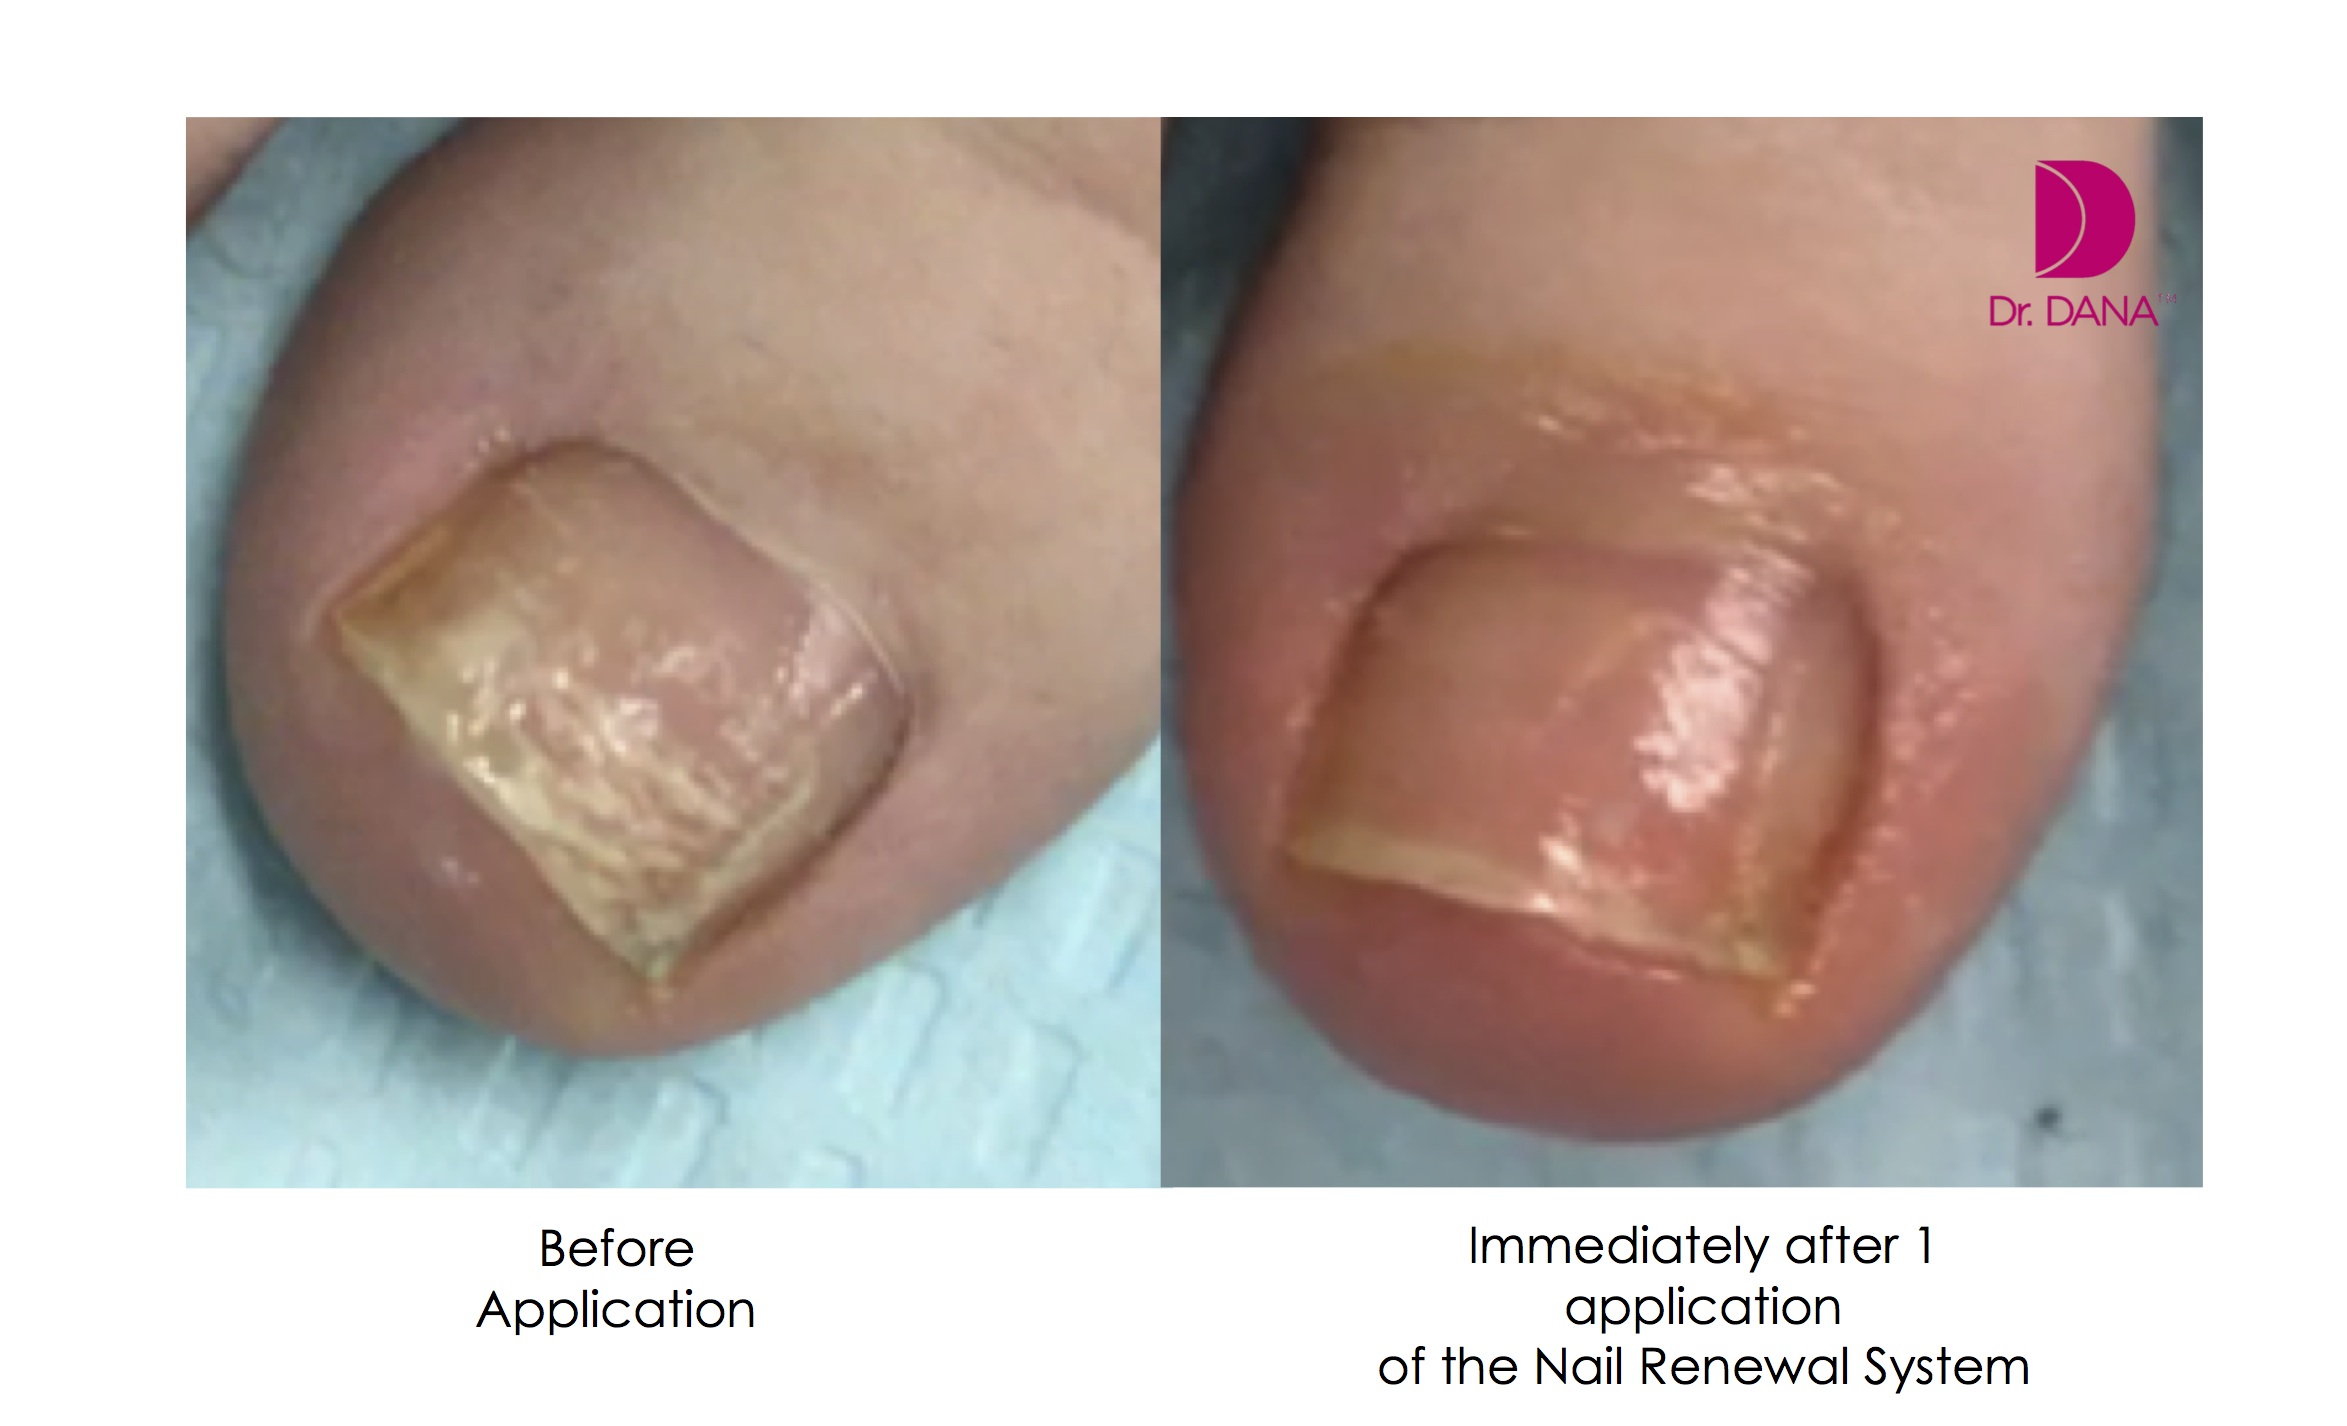
Polish induced nail yellowing is a cosmetic issue.  There are two options as far as treatment.  The first is to take a nail polish holiday and to try to lighten the nail.  Alternatively, the nail can be camouflaged with additional polish.  For those who want to treat, severe stains can be lightened by using a dilution of Hydrogen Peroxide.  This at home remedy can be made by combining three to four tablespoons of Hydrogen Peroxide and 1/2 cup of water and mix well, then soak nails for 2 minutes.  Using a soft toothbrush, gently scrub the surface of the nails.  Rinse with water.  Repeat 2-3 times per week as needed.  Alternatively, you can use a whitening toothpaste as these are formulated with Hydrogen Peroxide.  The Dr. DANA Nail Renewal System is great for lightening discolored nails.  Step 01 contains Glycolic Acid and combined with our Step 02 Perfect Grit Priming wand, the system is very effective at removing nail discoloration.   Avoiding polish is essential during the treatment period.

Is there anything you can do to prevent polish induced yellowing from happening? 

Keeping the canvas healthy is imperative.  Over filing the surface can theoretically lead to increase pigment leaching into the nail.  Don't forget to use a good quality base coat like the Dr. Dana Hydrating Base Coat unless the product specifies that one is not needed.  In most instances, a good quality basecoat will create a protective barrier layer for the nail plate.  Lastly, try to remove polish quickly.  If you need to rub for 10 minutes then the pigments have a better opportunity to leach into the nail.  Quickly remove the polish and wash hands immediately.

Other “non-medical” causes of nail yellowing include staining from extrinsic environmental exposures to ingredients such as tobacco, tanning products or Henna.  In these cases a thorough exposure history will usually uncover the yellowing culprit. 

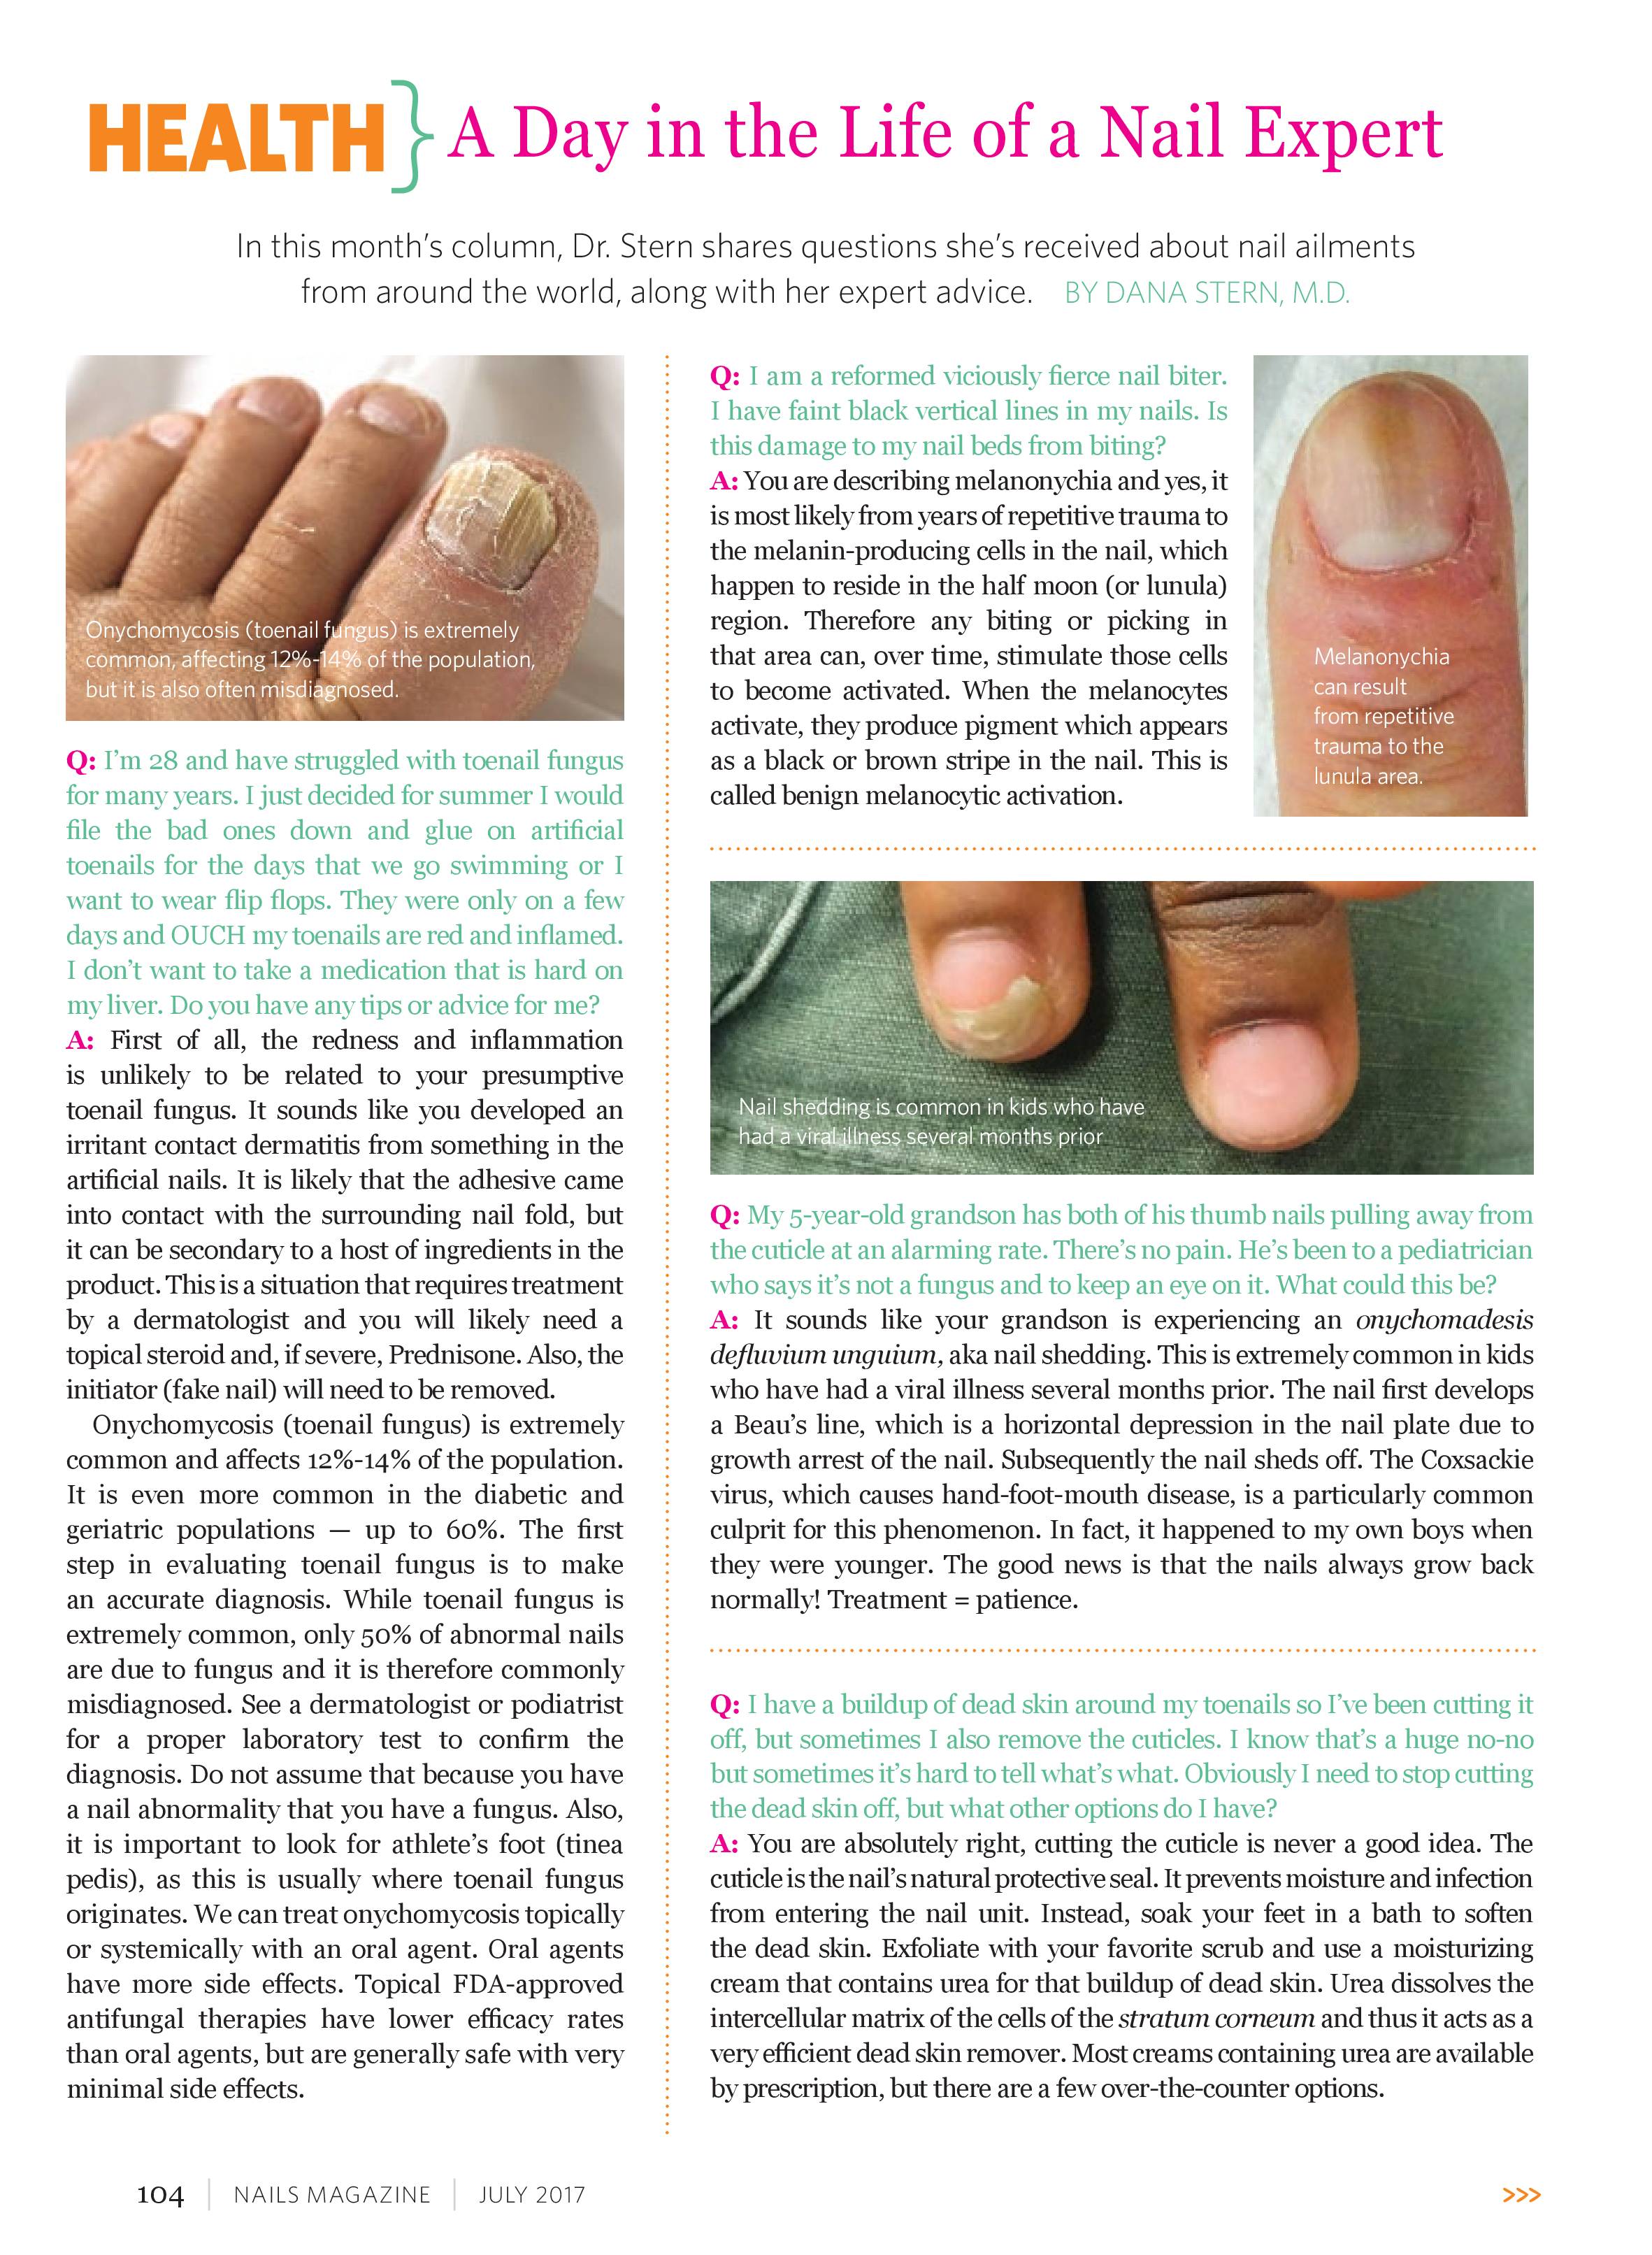
There are several causes of nail yellowing that are due to medical conditions.  The most common being fungal infections of the nail.  Fungal infections of the nail can make the nails thick, yellow, and crumbly.  Proper diagnosis and treatment are essential to be able to achieve resolution.  Nail fungus (onychomycosis) affects approximately 35 million people in the United States.  Fungal nails can be yellow, thick, and crumbly or they can have yellow streaks within the nail plate and be generally smooth and intact.  It is far less likely to have a true fungal infection of the fingernails, ie. one that is caused by a dermatophyte.  Most toenail fungus starts off in the soft tissue, as athlete’s foot, and then enters the nail when there is an injury or lifting of the nail.

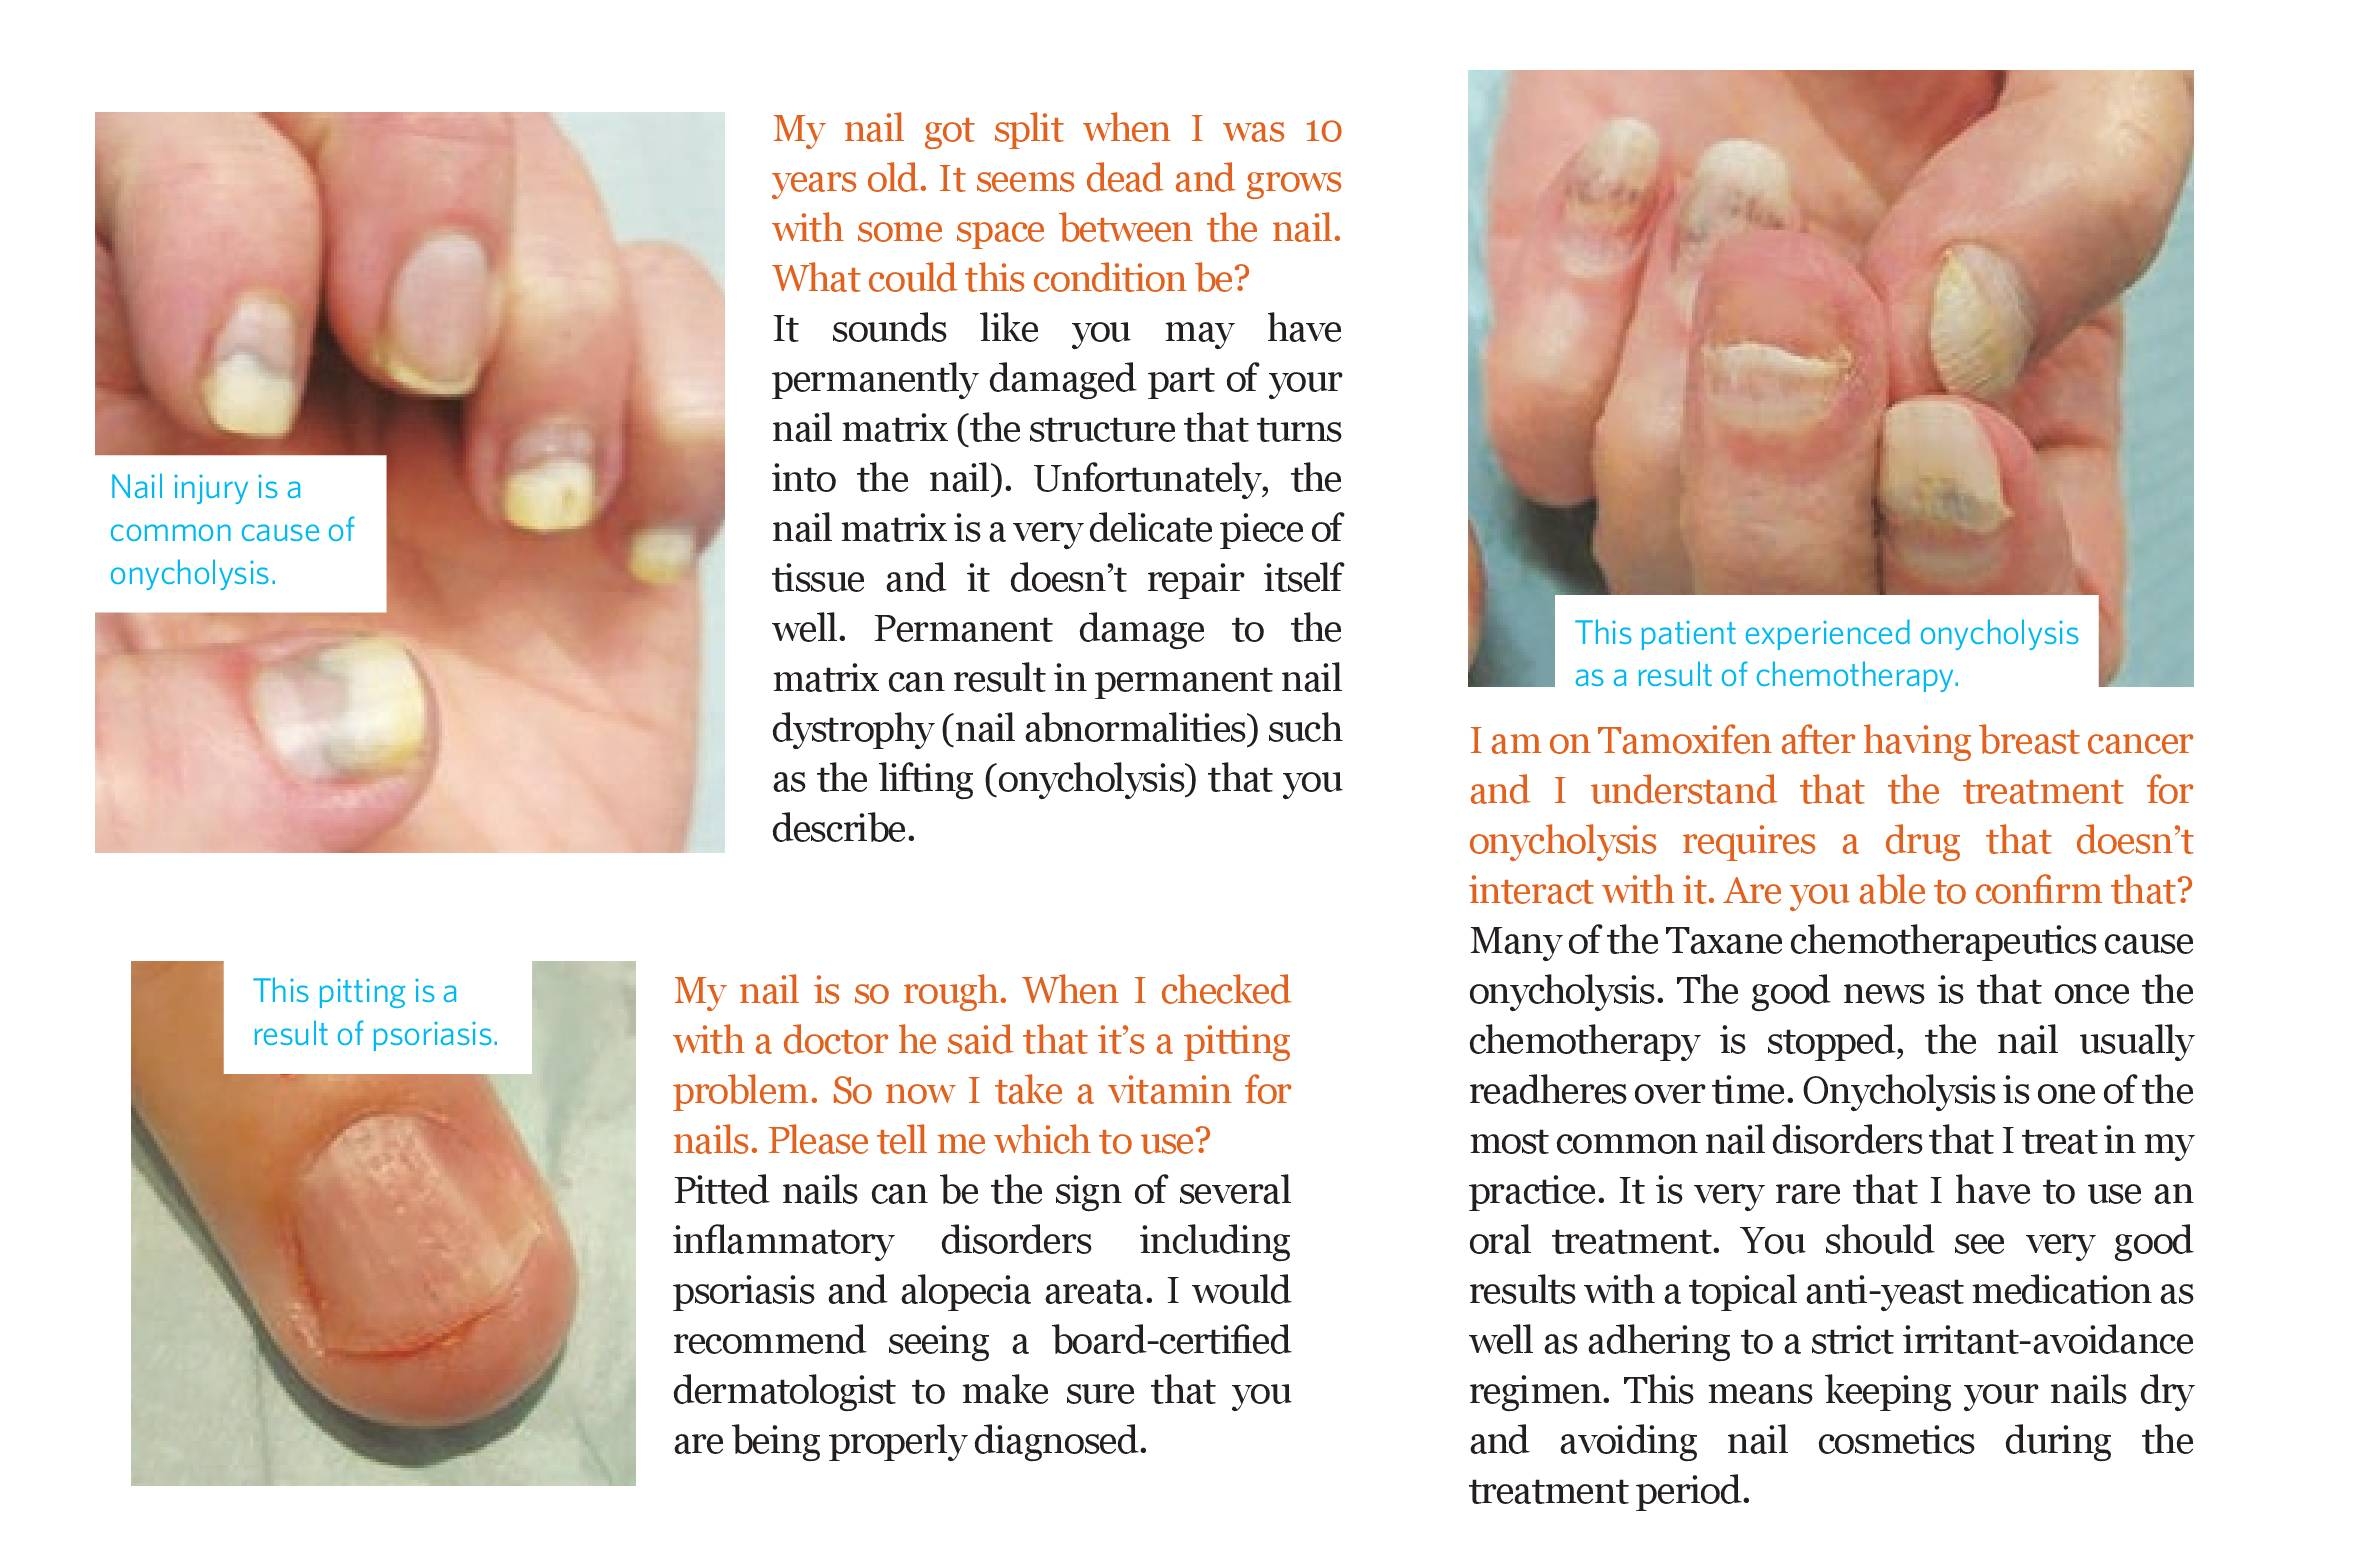
Onycholysis, or separation of the nail plate from the underlying nail bed is another potential cause of nail yellowing.  This common condition is often observed on the fingernails in contrast to Onychomycosis where the majority of cases are confined to the toenails.  When the nail lifts off of the nail bed, the nail will appear as a white to yellow opacity in the area of separation.  This is due to air and other debris under the compromised nail plate.  Although there are many causes, the most common include overly aggressive cleaning under the nail as well as some inflammatory conditions such as psoriasis.  When the nail is separated, yeast often colonize on the nail bed as it is a barrier compromise that is allowing water and moisture to settle under the nail and these are the ideal conditions that allow yeast to flourish.  Treatment will usually include adhering to a strict irritant avoidance regimen where nail polish remover and exposure to household chemicals and water is avoided.  Polish removers are strong solvents that will cause irritation to the delicate nail bed tissue when there is an opening under the nail plate.  Additionally, a prescription topical anti-yeast treatment will often need to be prescribed.

The Yellow Nail Syndrome is another non-cosmetic cause of nail yellowing.  The toenails appear thick and have a yellow to green tinge and frequently lack a cuticle as well as lunula  (the half moon that is usually visible on the thumb nail and great toenail).  This entity is due to failure of the nail to grow sufficiently and is associated with lymphatic disease as well as lung disease or malignancy.  The underlying disorder must be treated but tends to be chronic.


Is It Possible To Be Allergic To Manicures ?

Is it possible to be allergic to manicures?

Allergic reactions to beauty and personal care products occur when the skin is repeatedly exposed to small amounts of the allergen over months to years.  The reaction to the allergen usually appears several days after the cosmetic has contacted the skin and can appear as redness, swelling, and blistering of the skin or surrounding the nail.  Sometimes the nail will burn and then separate or lift off of the nail bed.  Interestingly, when the stimulus is a nail ingredient, the rash does not always appear on the fingertips and sometimes presents as a rash on the eyelids, the lips arms, chest or neck.   Allergic reactions to nail products are much less common than irritant reactions.  Anyone can develop an irritant reaction to a nail product if enough of the chemical comes in contact with the skin and because irritant reactions can look like allergic reactions, distinguishing the two can be challenging but is important because allergies tend to be life-long whereas irritant reactions are not.  Also, if you have a true ingredient allergy then you will likely be allergic to any product that has that ingredient or even ingredients with a similar chemical structure.  Therefore, it becomes important to be able to distinguish allergic from irritant reactions and patch testing is the best method to accurately differentiate between the two.  Dermatologists patch test by applying a concentrated amount of the suspected chemical to the skin on the patient’s back and the skin is usually evaluated two and then four days later.

What exactly is the reason for the reaction? What are people actually allergic to?

There are hundreds of ingredients in personal care products and nail cosmetics that can cause allergic reactions.  In the nail salon, allergies can occur to soaps, hand sanitizers, fragrance or preservatives in hand and foot creams, reactions to ingredients such as uncured methacrylate or acrylate oligomers and monomers in gels, tosylamide/formaldehyde resins or toluene which are in some nail polishes and hardeners, and even airborne induced allergies can occur from dust from acrylics and fumes from glues.   In the salon, enhancements in particular are often the culprit because of improper curing.  Once the product is cured completely, it cannot cause an allergy.  However, any repetitive skin contact with uncured gels, resins, monomers or adhesives can cause allergic reaction to develop.

 What are some signs that someone might be allergic?

Often allergies from nail cosmetics can appear on the face.  Think, itchy, swollen eyes, or lip swelling.  When the reaction is localized to the nails possible reactions include: redness, swelling, and blistering of the skin or surrounding the nail.  Sometimes the nail will burn and then separate or lift off of the nail bed.  A new reaction that has recently been observed from allergies to the gel manicures (UV soak off gels) is a psoriasis reaction of the nail bed.  The nails appear to develop psoriasis suddenly after documented exposure to gel manicure.

Are people more likely to be allergic to gel manicures than regular ones?

Anything that requires curing is theoretically a larger allergen risk.  Nail techs are a lot more at risk than nail clients for allergy development because they have repetitive exposures.  For techs: The biggest thing that techs can do is to know the products that they are working with inside and out.  Proper curing of products is essential as repeated exposure to improperly cured product is one of the biggest reasons for salon tech product sensitivity.   Improper curing can occur from using the wrong nail lamps as every product requires a specific UV wavelength for proper curing.   There is no such thing as a universal lamp that works for all products and brands.   Other causes of improper curing include applying product too thick, mixing brands, rushing through a service and not allowing proper cure time, using incorrect liquid to powder rations and not maintaining and cleaning UV bulbs.   Nail techs should always follow the manufacturers instructions and not rely on fellow technicians or on-line videos.  If a client calls hours later to report the reaction then it is more likely to be an irritant induced reaction.   Salon technicians should have relationships with local dermatologists that they can refer their clients to in an event like this.  If the client’s reaction is on or surrounding the nails and you the gel or enhancement product has just been applied, it is important to not soak them off until they are seen and treated by a dermatologist.

 Any advice on how to avoid these reactions (other than simply giving up nail polish for good)?

The best advice is to avoid the allergy from the get go.  Look for polishes that are Free of the common culprits (9-Free).  Nail techs can also consider wearing gloves.  Nitrile gloves are preferred as many clients may be latex sensitive.  As previously stated, avoiding skin contact is the key to minimizing risk.  General operational protocols such as keeping tools, containers and working surfaces clean and dust free.

If the reaction is confirmed to be a true allergy then avoidance of the allergic trigger is imperative and avoiding other products with the ingredient will also be key.

Would you recommend women experiencing these reactions visit an allergist to know for sure?

They should visit a board certified dermatologist who has extensive experience with patch testing.

Peeling Nails aka. Onychoschizia

Peeling nails (onychoschizia) are one of the two clinical criteria for brittle nails, the other being ridging (onychorrhexis).  Peeling nails can be genetic, age related (more common as we age), and product related (strong solvents like acetone can dry out the nail causing brittleness).  If these changes come on suddenly in someone who previously always had great, healthy nails, then anemia or thyroid disease should be explored by a physician. 
Although challenging to treat, peeling nails can be dramatically improved by the following recommendations:

1) Use a high quality glass file instead of an emery board
These files are great for those who are prone to onychoschizia (peeling and breakage at the tip of the nail) because they do not cause the microscopic tears that typical emery boards cause.  Also, they can be sanitized easily for reuse and never dull.  

2) Use nail polish remover sparingly and stick to formulas that are acetone free
Polish removers are solvents and tend to be very drying and dehydrating to the nail.  Constant use of remover can lead to dry, brittle nails (weak nails and peeling nails).   Limit remover use to a maximum of once weekly.  Always be sure to wash your hands after polish is removed to remove any solvents. 

3) Nail polish can be protective for peeling nails!
Certain nail damage (nail peeling for example) will actually benefit from nail polish because the polish serves as a kind of glue to hold the delicate, fragile onychocytes (nail cells) together.  This is especially relevant if your nails are exposed to a lot of water.  However, limit polish remover to acetone free formulas and try to limit remover use to a maximum of once weekly.

4) Nail exfoliation
When your skin is dry and peeling you reach for the nearest luffah or Clarisonic brush to exfoliate the dead cells in order to allow for maximum absorption of your moisturizer.  The same concept is true of the nail.  If you were to look at a peeling nail under the microscope you would see that the nail cells are detached, lifted, separating….this is why the nail peels, splits and even why polish doesn't always go on so smoothly and has more of a tendency to chip.  Essential exfoliation (removing the aforementioned damage) is key!  Achieve essential exfoliation and beautiful, healthy nails instantly with the Dr. Dana Nail Renewal System.  The Nail Renewal System is the first ever nail treatment system to incorporate Glycolic Acid (an alpha hydroxy acid) that has been shown in the medical literature to have nail rejuvenation properties.  

5) Treat peeling nails with effective ingredients
Not all nail moisturizers are created alike.  Look for formulas that are rich in phospholipids like sunflower oil.  Avoid purported nail treatments that require polish remover as this will exacerbate the issue.  And always avoid formulas that contain Formaldehyde or Formalin as this chemical in addition to be a potential carcinogen, irritant and allergen will cause the nail to stiffen and eventually induce paradoxical brittleness and peeling nails.  

6) Use gloves with any wet work.
Excessive exposure to water can have a harmful effect on the nails. The nail is like a sponge, it is significantly more absorptive of water than the skin (1000 times more than the stratum corneum of the skin) for example and so water can easily diffuse into the nail.  The delicate nail cells (onychocytes) are put under significant strain and this leads to brittleness, peeling nails and breakage. 


Nail Diseases

Discolorations, Cracks or Lines on Nails: What Do They Mean?

White Lines on Nails

White spots, streaks and faint white lines on nails are nothing to worry about. But some white lines can be of concern. Dr. Stern breaks down the different types of lines on your nails that indicate it’s time to see a dermatologist.

  • Mee’s Lines: White bands that follow the contour of the lunula (half moon). Arsenic poisoning is the classic cause; however, there are also many other potential medical causes including certain vitamin deficiencies and infections.
  • Beau’s Lines: Horizontal depression in the nail plate due to growth arrest of the nail from illness, fever or trauma.
Read More

Vicks VapoRub For Toenail Fungus ?

Vicks VapoRub For Toenail Fungus? 

A small study published in the Journal of the American Board of Family Medicine tested whether VapoRub had a positive effect on those with toenail fungus. The study, focused on 18 people who used VapoRub on their toenails for 48 weeks, concluded the ointment can help.

Dana Stern, MD, a dermatologist and nail specialist based in New York City, explained why the study (and the overall remedy) should be taken with a grain of salt. "One of the biggest issues with self-treating using home remedies is that the diagnosis is not correct," Stern explained. "Not all yellow, thick, abnormal toenails are fungal; in fact, half are not." She suggests seeing a dermatologist if your VapoRub "treatment is not working after four months for toenails and two months for fingernails."

Are Your Feet Ready For Sandal Season?

Seeing this phenomenal bronze Einstein sculpture by Robert Berks made me think about sandal season.  Interestingly, Einstein had difficulty tying his shoes and so often wore sandals as depicted in this work.  Some tips on getting ready for sandal season:

In winter, cold, dry air and over-heated homes result in dry, callused, cracked feet and heels.  During the winter months, our feet are hidden in socks, tights and boots and we tend to neglect our foot care because nobody is looking.  As a result callus builds, feet are dry and cracked and toenail polish is often left on for way too long creating white surface irregularities at the toenails that are revealed upon removal of polish (keratin granulations).  Four easy tips to get your feet sandal ready:

 1)  First soften superficial dead skin cells and callus either chemically with creams that contain urea (prescription or over-the-counter) or mechanically with abrasives.

Product tips:   Over-the-counter Urea containing options include Kneipp Healthy Feet Anti-Callus-Salve, $25, available at DermStore. To mechanically remove the hard, scaly skin with an abrasive, I prefer a foot file with a removable grit such the Flowery Foot File with disposable/removable grit.   I am not a fan of pumice stones as they can harbor bacteria and molds once they become wet, due to their porosity.  If you are going to use a pumice, use it as a one time use item and dispose of it after each use. 

2) Use a rich moisturizer.  I am a huge fan of shea as a key moisturizing ingredient and particularly for the feet as it acts as a barrier for the skin and really helps to seal in moisture.  I love L’Occitane shea butter foot cream.  This particular formula also contains lavender oil making it a calming and relaxing before bed treat for you and your feet.  I also like CeraVe Renewing SA Foot Cream for the same reasons that I like other CeraVe moisturizers as it is packed with Ceramides and Hyaluronic Acid, thus mimicking the skin’s natural lipid barrier.  The addition of Salicylic Acid will help to prevent callus from returning.

 3) If your feet are not just dry and flaky but also red and itchy, you may have tinea pedis (athlete’s foot) and you should see a dermatologist.  Toenail fungus often begins on the skin and it is imperative to treat it before it gets to the nails.

 4)As for keratin granulations, those pesky white patches that appear on toenails often after prolonged polish exposure – The Dr. DANA™ Nail Renewal System will instantly remove these surface irregularities and discoloration leaving you with lustrous, shiny healthy toenails that are ready for a chic new pair of sandals this spring!  Launching March 25th on QVC!  


Winter Hand Maintenance Tips

As the weather starts to cool down, I start to see common problem among my patients – dry, cracked hands that are often sensitive and painful! This is because in winter, the outside humidity and temperature drops and indoor air becomes a lot drier.  Most people are also washing their hands more frequently or using alcohol based hand sanitizers as flu and cold prevention. As a result, the skin on the hands become dehydrated and parched.  Lines around your cuticles and knuckles can also be the result of dryness.

 The key to beating dry skin is remembering to moisturize often.  Products that contain emollients and humectants are best.  I am a huge fan of moisturizers that contain shea as it acts as a barrier for the skin and really helps to seal in moisture.  I also like to look for products with glycerin and rich hydrating oils such as Coconut Oil to help with hydration.  If your hands are already severely chapped, I suggest using a hydrating overnight treatment with hand gloves.  I recommend carrying a cuticle pen for dry for cracked cuticles like Essie’s The Cuticle Pen or a hand moisturizer like L’Occitane’s Shea Butter Hand Cream.  

Finally, try to stay as hydrated as possible throughout the winter.  We often forget to drink water when we are cold.  Hot water with lemon works too!

Everything You Ever Needed to Know About Brittle Nails But Were Afraid To Ask

Nails are composed of small cells made up of a protein called keratin.  If you were to look at a nail under a microscope the cells look like roof shingles.  These cells are very delicate and extremely absorbent, about ten times more so than skin.  This is the reason your nails have much more flexibility after soaking in water.


Can I prevent brittle nails?


It depends.  If you develop brittle nails out of the blue, it is potentially a sign of a health issue such as anemia, or a thyroid condition.  Therefore, if brittle nails are new for you, see your doctor.  Those suffering from an eating disorder or undergoing chemotherapy may also experience nail brittleness as a result of a diet low in protein.


If  you don’t have any medical conditions that contribute to brittle nails, there are a few reasons that you could be experiencing brittleness:

-Water exposure. Water is constantly being absorbed and then diffused back out by our nails.  This continuous process weakens nails because the delicate nail cells are in a constant state of contraction and expansion.  This strain causes lifting and breakage.

-Seasonal Weather Changes. In the winter going from a 70 degree indoor environment to a colder environment causes a change in humidity, and consequently a change in the water content of our nails.  This has the same effect as chronic water exposure.

-Chemical exposures. Nail polish remover is not your friend.  It may help remove that chipped manicure, but the ingredients, strong solvents, especially Acetone, dry out your nails.


What can I do to repair them?


-Avoid alcohol-based sanitizers

-Use cuticle oil consistently

-Take a break from polish, and give your nails 2-3 weeks to repair

-Try a Biotin supplement of 2000 mcg – 3000 mcg daily, sold over-the-counter at your local health food store or pharmacy.

-Consider using a crystal nail file.  They are much more delicate, especially for those who are prone to breakage.

The Hands of Time

Never before have there been more ways to turn back the hands of time and reverse signs of aging.  In a world where 50 is the new 30, every day there seems to be a new product or procedure to make us look younger.  But, the focus tends to be on the face and the neck while the hands, the other most visible unclothed area of the body, has been largely ignored.  Women are starting to look unmatched with youthful faces but the hands of a grandmother.  This is mainly because most women are not aware that there are as many cosmetic options for the hands as there are for the face. In this day and age where we live in a “hand-held” world, I have devoted my practice to giving hands the attention they deserve.

No different than wrinkles on a sagging face, hands are a tell tale sign of aging.  Hands begin to age due to volume loss and from excessive UV damage.  As we get older, we begin to see pronounced veins and tendons, brown spots, loss of elasticity, wrinkles and a peau d’orange texture.  Many women are self-conscious by the unsightly appearance of their hands but are unaware that there is anything they can do to change it.

As one of the countries only nail specialists, I am also proud to offer my patients a variety of the most cutting-edge cosmetic procedures for the hand.  Hand recontouring restores volume and stimulates collagen regrowth to the hand.  For this procedure, I inject RADIESSE, an FDA approved volumizing filler, the results of which can last up to a year or longer.  In addition, there are several laser options.  For the removal of brown spots, I use the NdYag laser.  Fraxel, the go-to laser for facial resurfacing, can be used on the hands for a smoother, more even skin texture, to promote collagen regrowth, and to achieve an overall softening of wrinkles.  Regular chemical peels can also be very successful in brightening and evening skin tone and pigment.

The end result…. beautiful, youthful hands that women are no longer embarrassed by, but ready to head to the manicurist to put on a bright, glossy polish that is sure to get their hands noticed.


Back To Work

After Labor Day, as we get back to work, we begin to focus on our appearance.  Like a great new haircut or a terrific glow from a new skincare regimen, healthy, well-manicured nails are an integral part of a neat, well kept and put together appearance.  In an effort to transform back into professional mode many any of us are planning a visit to the nail salon this week.  Here are 5 helpful Salon Safety Tips to get your nails healthy, beautiful, and back to work!

1.     Cuticle Oil Dropper vs. Brush - Cuticle oil must be dropped as opposed to brushed onto a client’s cuticles.  Cuticle oil brushes are not sanitary to use on multiple clients because oils can easily harbor organisms such as bacteria and fungus.

 2.     Buffing Block – These tools can be miracle workers for buffing out superficial nail alterations or for polishing the nail to a beautiful shine but be careful that your nail technician is using the right grit for your nails!  Buffing grits vary like sandpaper grades and many of the buffers out there are meant for acrylics and not natural nails.  This is a one-time use item and should be used on only one client and then discarded!  Porous buffing blocks can harbor organisms such as bacteria and fungus.

 3.     Orange Sticks – These harmless looking double sided sticks often have a sharp tip on one end that is used for cleaning under the nail and a blunt tip on the other end used for pushing back at the cuticle.  Be careful with cleaning under the nail as a sharp object under the nail can cause the nail to separate from the nail bed.  In salons these tools should be one time use only!

4.     Hand Washing – This may sound obvious, but you might be surprised!  Your nail technician should always wash his or her hands before and after attending to you.

 5.     Emery Board – This is a one-time use item and should be used on only one client and then discarded!  Porous emery boards can harbor organisms such as bacteria and fungus.

A Healthy Nail is a Beautiful Nail

The recent problems highlighted by Mentality Nail Polish reminded me of how important it is to carefully review beauty and personal care product ingredients and to choose reputable companies where health is emphasized in addition to beauty.   Recently, users of Mentality Nail Polish reported nail lifting, redness, and burning sensations after they applied the polish.  The photos consumers posted appeared to be a condition called onycholysis – when the nail lifts off of and separates from the underlying nail bed. 

Reps from the company have blamed the Arminex base used in their polish, claiming some users may have experienced some sensitivity to the product though bloggers have speculated that it was contaminated with other potentially harmful ingredients.  The alarming reality is that something as fun and harmless as a nail polish can pose a legitimate health risk.  Small batch or indie manufactures often are constrained by budgets and don’t perform the same types of tests that  larger companies invest in.  The FDA is not obligated to test cosmetic products prior to being released to market. The responsibility to research ingredients and to seek out trustworthy companies falls on the consumer.

I have discussed the health hazards of nail polish before – many nail polishes continue to contain toxic ingredients.  I always recommend using a 5-free nail polish (excludes DBP, Toluene, Formaldehyde Camphor and Formaldehyde Resin).  DBP is an endocrine disruptor, meaning it is a reproductive toxin that has been related to lifelong male reproductive issues.   Toluene can lead to nervous system disorders.   Formaldehyde is a suspected carcinogen and while it can help create a harder nail plate, it also lowers flexibility and increases brittleness over time.  Furthermore, Formaldehyde can cause nail changes such as bluish discoloration/throbbing pain, infections, and dryness of fingertips.  Camphor has a direct effect – it can lead to headaches, dizziness, and nausea, and Formaldehyde Resin is a known allergen and its effects start with the lifting of the nail and can lead to more severe reactions such as burning, itching, irritation, and peeling of the surrounding skin.

As always, I recommend taking your health into your own hands.  Choose products from well established reputable companies where health is emphasized.  After all a healthy nail is a beautiful nail.


Read More

Sunscreen Decoded

What does SPF means?

SPF, or Sun Protection Factor, indicates how long it will take for UVB rays to redden skin when using a sunscreen, compared to how long skin would take to redden without the product.  UVB rays cause sunburn and can contribute to skin cancer, however we now also know that UVA rays also contribute to both photo-aging and skin cancer as well.  UVA contributes to and may even initiate the development of skin cancers.  Therefore, the SPF is only telling you how much protection you are getting from the UVB rays, and not the damaging UVA rays!

What is broad spectrum protection?

Broad spectrum simply means that it blocks BOTH UVA and UVB rays. Therefore, you MUST always choose a sunscreen that is broad spectrum.

But what SPF level should I use?

While certain oils and lotions with low SPF are labeled as sunscreen, I always recommend using a sunscreen with at least SPF 30.  Beyond 30, the protection gained becomes negligible.  To give you an idea of how well you are protected, SPF 15 blocks 94% of rays, SPF 30 blocks 97%, SPF 50 blocks 98%, and SPF 100 block 99% of rays. But be careful! Just because you use a sunscreen with a higher SPF does NOT mean you are protected for a greater length of time – you must reapply EVERY 2 HOURS. 

Do the ingredients in sunscreen matter?

Yes!!!  Broad spectrum sunscreens contain either chemical blockers or physical blockers.  Physical blockers such as Titanium Dioxide and Zinc Oxide are more effective and are my ingredients of choice. Make sure that these ingredients are listed in the active ingredients of the sunscreen you choose. 

How often should you reapply?

I recommend reapplying sunscreen every 2 hours if you are consistently outside.

Should I use sprays or lotions?

I don’t love sprays simply because I don’t like the idea of inhaling all of those chemicals. 

I always sit in the shade so I don’t need sunscreen, right?

This is a common misconception.  While sitting in the shade generally protects you from getting a sunburn, sand and water can still reflect UV radiation, so you are still exposed! Similarly, even if it is a cloudy day, UV rays can break through a cloud cover.   I am a huge fan of sun protective clothing. As someone who lives at the beach, you will always see me in a rash guard and wide brimmed hat.

I wear sunscreen every time I go outside – what else can I do?

Make sure that you are protecting every part of your body – ears, neck, feet, head, and lips are often neglected.   Remember to apply sunscreen at least 15 minutes before exposure, not when you get to the pool.  Hats, lip balm, and shoes can all help protect exposed parts that are often forgotten.


It is tick season...

It is tick season in The United States.  Whether it is The American Dog Tick (a carrier of Rocky Mountain Spotted Fever and Tularemia), the Blacklegged Tick (most in famous for spreading Lyme, Anaplasmosis, and Babesiosis), the Dog Tick (carrier of Rocky Mountain Spotted Fever), or the easiest of the bunch to identify, the Lone Star Tick (carrier of Ehrlichiosis, Tularemia and STARI), ticks are omnipresent at this time of year no matter where you live.  If you live on the East Coast, chances are that you know someone who has recently removed a tick or has been diagnosed with Lyme’s disease.  There is so much confusion when it comes to this topic and so back by popular demand, the Dr. Dana Tick Blog.  Here are some tips and resources to help you and your family stay safe this summer!


Prevention:

·      Check for ticks daily, especially under the arms, in and around the ears, inside the belly button, behind the knees, between the legs and in the buttocks, around the waist, and on the hairline and scalp.  Children should be checked every night at bath time as part of your spring/summer routine if you live in a tick endemic area.

·      If you have spent time in a wooded or grassy area remove, wash and dry all clothing on high heat and shower as soon as possible.

·      Permethrin based insect repellant can be very effective for tick prevention.  The product should be sprayed on clothing or shoes and NOT directly on skin.  Several brands such as Repel are available on-line.

·      Create a “tick-safe” yard by mowing the lawn frequently, keeping leaves raked, and having children play away from tall grasses.  Consider having your property sprayed.

·      Treat your dogs and cats as recommended by your veterinarian.  Do not allow them into your bed or on your furniture, as they are a possible vector for carrying ticks.


How to safely remove an attached tick:

·      Fine tipped tweezers are best.

·      Place tweezers as close to the skin as possible.  Try to grab at the base of the tick (the tick’s head).  Pull upward with a slow and steady motion.  Do not be alarmed if part of the tick remains embedded, as disease transmission is not possible without the whole tick.  Try to remove the remaining segments.

·      Wash the area with soap and water.

·      Put the tick in a sealed baggie ie. a ziplock™ and label the bag with the date the tick was removed and location.  Your dermatologist can have the tick analyzed to identify the type of tick as well as whether that particular tick has the organisms within it that cause disease.  This information can be very helpful in guiding therapy.


Important tick facts:

·      In general ticks need to be attached for 36-48 hours before they can transmit Lyme disease bacteria.

·      If you find a tick that has likely been attached to your skin for less than 72 hours and you are >8 years old, an important study has shown that taking one dose of Doxycycline can dramatically reduce your chance of getting Lyme’s Disease.  (87% effective) Call your dermatologist to discuss the best approach for you.

·      There are several different types of ticks (Ixodes, Lone Star, Dog Tick etc), and each tick has different stages of growth when they may or may not carry disease.  This is why identifying the tick can be very helpful.

·      Most humans are infected through bites of immature ticks called nymphs.  Nymphs are tiny (less than 2mm) and difficult to see without a magnifier; they feed during spring and summer months.

·      Ticks can be carried by deer, rabbits, birds, squirrels, mice, dogs and cats and therefore all of these animals are potential vectors for the spread of tick-born illness.

Please call my office if you would like to come in to have a tick tested or if you have any tick related questions or symptoms.

In The Country, we are located at 325 Meetinghouse Lane, Southampton 

631.287.7307


In The City we are located at 905 Fifth Avenue at 72nd Street

212.734.4007

www.drdanastern.com (for direction to the offices)

Tick Resources:  Tick Hotline 631.726-TICK; Eastendtickresources.org & Tickencounter.org